
Contents
Introduction
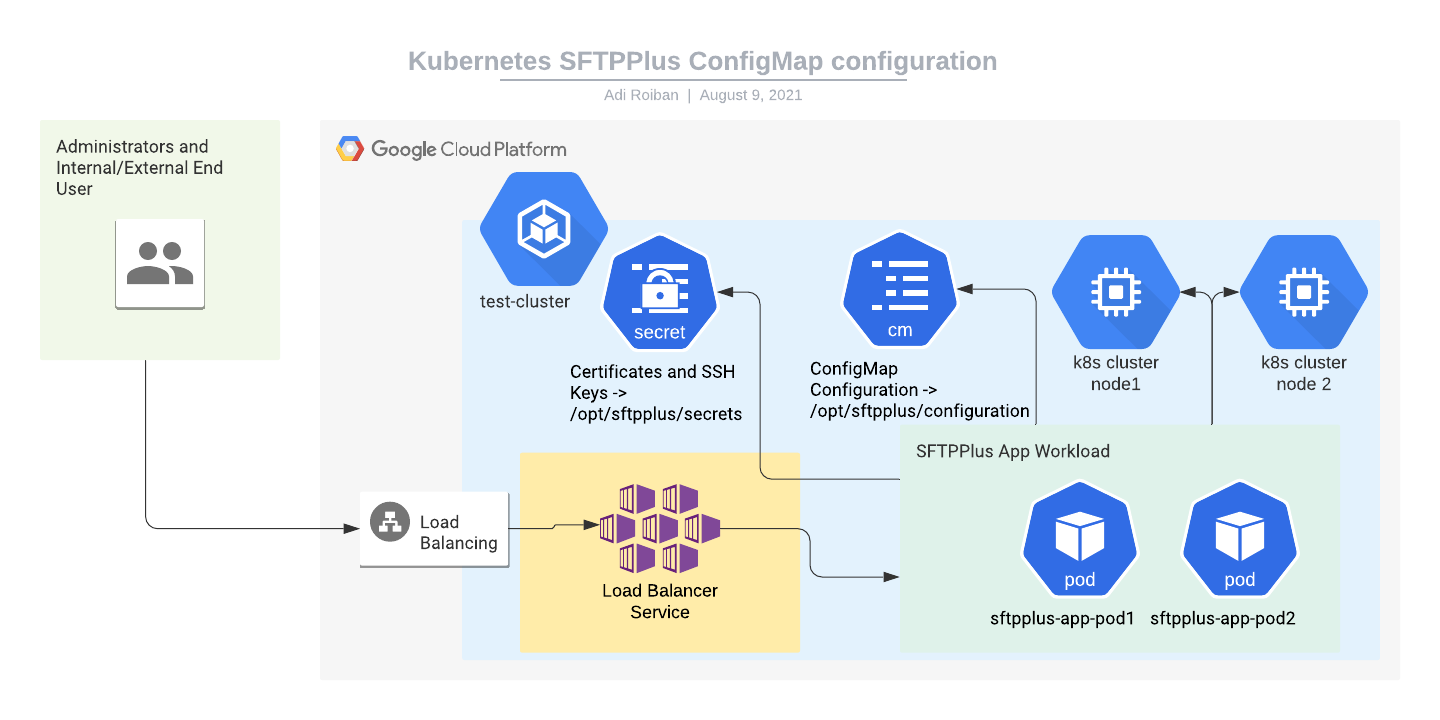
This article describes managing the SFTPPlus configuration for a deployment through any Kubernetes Engine service.
It only looks at stateless configuration management. Data persistence is described in other articles.
The container image used in this example is the DockerHub SFTPPlus Trial.
The source of the container image is available from our public GitHub SFTPPlus Docker repository.
The example Kubernetes YAML file can be found in our GitHub SFTPPlus Kubernetes repository
It assumes that you already have a working Kubernetes cluster.
Don't hesitate to get in touch with us for comments or questions.
Final result
Once completing the steps in this guide, you will have an SFTPPlus application with the following services:
- Port 10020 - HTTPS web based management console
- Port 443 - HTTPS end-user file management service
- Port 22 - SFTP end-user service
All these services will be available via your cluster IP address.
The management console will be used in read-only mode to verify the state of the SFTPPlus application.
Any configuration changes for SFTPPlus will be done by editing the cluster ConfigMaps or Secrets values.
The ConfigMaps changes are not observed in real time inside the pods. They are in-memory read-only data created together with the pod based on the ConfigMap value at the time of the pod creation. To have the SFTPPlus application use the updated configuration you will need to redeploy each pod. This can be done using the cluster rolling updates features.
Moving parts
For implementing the SFTPPlus service we will be using the following parts:
- The SFTPPlus Trial container image hosted at Docker Hub.
- A Google Kubernetes Engine. This is a prerequisite for this article. The article doesn't cover the creation of a new Kubernetes cluster.
- A Kubernetes Load Balancer service for connecting the application to the Internet. Instructions for creating this are provided below.
- A Kubernetes workload for hosting the SFTPPlus application. Instructions for creating this are provided below.
- A Kubernetes secret for storing the private key and other sensitive information. Instructions for creating this are provided below.
- A Kubernetes ConfigMap for storing the configuration file content. Instructions for creating this are provided below.
SFTPPlus cluster ConfigMap configuration
This section describes the process of creating the SFTPPlus configuration files that are managed inside the cluster as ConfigMap objects.
It assumes that you will upload the following YAML file named sftpplus-configuration.yaml to your cloud console:
apiVersion: v1
data:
  server.ini: |
    [server]
    uuid = single-server-uuid
    name = sftpplus-pod
    authentications = username-blocker-uuid, ban-ip-uuid, DEFAULT-AUTHENTICATION
    manager_authentications = ban-ip-uuid, DEFAULT-AUTHENTICATION
    password_minimum_strength = 4
    password_minimum_length = 8
    password_hashing_scheme = crypt-sha512

    ssl_certificate = /opt/sftpplus/secrets/server_certificate.pem
    ssh_host_private_keys = /opt/sftpplus/secrets/ssh_host_rsa_key

    [authentications/DEFAULT-AUTHENTICATION]
    enabled = Yes
    type = application
    name = SFTPPlus Accounts and Administrators
    description = This authentication method allows authentication of accounts
        and administrators defined in this configuration file.

    [authentications/username-blocker-uuid]
    enabled = Yes
    type = deny-username
    name = Deny Admin Accounts
    description = Deny all administrator accounts.
    ; You can add more accounts to the list.
    usernames = root, adm, admin, administrator


    [authentications/ban-ip-uuid]
    enabled = Yes
    type = ip-time-ban
    name = Ban IP with multiple failures
    description = Will ban the source IP for 10 minutes after 10 consecutive failures.
    ban_interval = 600
    ban_after_count = 10

    [event-handlers/e137661a-150d-48f4-9239-4d9661492c11]
    enabled = True
    type = standard-stream
    name = Standard Output Logger
    entry_content = {timestamp.iso_8601_local} {id} {component.uuid} {account.name} {account.peer.address}:{account.peer.port} {message}

    [services/DEFAULT-MANAGER]
    enabled = Yes
    name = local-manager
    type = manager
    address = 0.0.0.0
    port = 10020
    ssl_cipher_list = secure
    ssl_allowed_methods = tlsv1.2 tlsv1.3


    [services/sftp-1]
    enabled = Yes
    name = sftp-service
    type = ssh
    sftp = Yes
    scp = No
    address = 0.0.0.0
    port = 10022
    ssh_cipher_list = secure
    ignore_create_permissions = No
    idle_connection_timeout = 300
    maximum_concurrent_connections = Disabled

    [services/https-1]
    enabled = Yes
    name = https
    protocol = https
    address = 0.0.0.0
    port = 10443

    [resources/DEFAULT-LETS-ENCRYPT]
    enabled = no
    name = Lets-Encrypt-Client
    type = lets-encrypt

    [resources/DEFAULT-SQLITE]
    name = Embedded DB
    type = sqlite
    path = log/cache.db3

    [resources/DEFAULT-EMAIL-CLIENT]
    name = Email-Client
    type = email-client
    email_from_address = sftpplus@example.com
    email_to_recipients = admin-team@example.com
    address = smtp.example.com
    port = 25

    [resources/DEFAULT-ANALYTICS]
    enabled = Yes
    type = analytics
    name = Analytics engine
    monitor_interval = 600

    [administrators/DEFAULT-ADMINISTRATOR-UUID]
    enabled = Yes
    name = admin
    password = $6$rounds=80000$oPp2OCqqSflb2YN5$KdXiAO6fhkObjBx6tJnS/EZ3bzcxeO1RPvJchBVXR00Gnj5O35fAC07psTBz4KE2AGbq/lZ.ifS7SrkDZmow00
    role = DEFAULT-ROLE

    [roles/DEFAULT-ROLE]
    enabled = Yes
    name = Default Super-Administrators

    [groups/DEFAULT_GROUP]
    name = DEFAULT_GROUP
    enabled = Yes
    home_folder_path = /srv/home
    create_home_folder = Yes

    [accounts/bdb99c31-1119-4b8b-b609-63672a9a0b6f]
    name = test_user
    type = application
    enabled = yes
    group = DEFAULT_GROUP
    home_folder_path = /srv/storage/test_user
    password = $5$DfjfEI8R1.fpGQg9$A95Q7ENuO2Bfk95k8gCwOP6YzWmVe8vTz2fcPkGpmp6
    ssh_authorized_keys_content = ssh-rsa AAAAB3NzaC1yc2EAAAADAQABAAAAgQC4fV6tSakDSB6ZovygLsf1iC9P3tJHePTKAPkPAWzlu5BRHcmAu0uTjn7GhrpxbjjWMwDVN0Oxzw7teI0OEIVkpnlcyM6L5mGk+X6Lc4+lAfp1YxCR9o9+FXMWSJP32jRwI+4LhWYxnYUldvAO5LDz9QeR0yKimwcwRToF6/jpLw== Comment for this key

kind: ConfigMap
metadata:
  name: sftpplus.configuration
  namespace: default
You can modify the content of the server.ini ConfigMap key to match your desired configuration.
With the YAML file available in the cloud console, you can create the service by using the following command:
kubectl apply -f sftpplus-configuration.yaml
Certificates and private key management
The certificates and their associated private keys, together with the SSH private keys are managed inside the cluster using the Secret configuration object.
For simplicity, we will use a single opaque secret that will store both SSL certificates and SSH keys.
It assumes that you will upload the following YAML file named sftpplus-secrets.yaml to your cloud console:
apiVersion: v1
kind: Secret
metadata:
  name: sftpplus.secrets
  namespace: default
type: Opaque
stringData:
  server_certificate.pem: |

    -----BEGIN CERTIFICATE-----
    MIIEqzCCApOgAwIBAgIRAIvhKg5ZRO08VGQx8JdhT+UwDQYJKoZIhvcNAQELBQAw
    CONTENT OF YOUR SSL CERTIFICATE
    EACH LINE STARTING WITH 4 empty spaces.
    n5Z5MqkYhlMI3J1tPRTp1nEt9fyGspBOO05gi148Qasp+3N+svqKomoQglNoAxU=
    -----END CERTIFICATE-----
    -----BEGIN RSA PRIVATE KEY-----
    MIIEpAIBAAKCAQEAzLUJYbSpjSAOSpxfns/w111mRls/FrHIC358fCxZsWzVXX/6
    CONTENT OF YOUR SSL PRIVATE KEY
    3042tKnu6zmZTLfcZFxQ8rCrrzzezs2odb9FxVA3bTc18tmudeAUyQ==
    -----END RSA PRIVATE KEY-----

  ssh_host_rsa_key: |
    -----BEGIN RSA PRIVATE KEY-----
    MIIEpAIBAAKCAQEAzLUJYbSpjSAOSpxfns/w111mRls/FrHIC358fCxZsWzVXX/6
    CONTENT OF YOUR SSH PRIVATE KEY
    3042tKnu6zmZTLfcZFxQ8rCrrzzezs2odb9FxVA3bTc18tmudeAUyQ==
    -----END RSA PRIVATE KEY-----
For security reasons, the above example does not include real keys and certificates. You will need to replace them with your own data. It is important to use the same indentation for the content of the file.
kubectl apply -f sftpplus-secrets.yaml
Kubernetes load balancer and Internet access
This section describes the process of creating a Kubernetes load balancer service to allow external Internet access to the SFTPPlus application.
It assumes that you will upload the following YAML file named sftpplus-service.yaml to your cloud console:
apiVersion: v1
kind: Service
metadata:
  finalizers:
  - service.kubernetes.io/load-balancer-cleanup
  labels:
    app: sftpplus-app
  name: sftpplus-app-load-balancer
  namespace: default
spec:
  externalTrafficPolicy: Cluster
  ports:
  - name: 10020-to-10020-tcp
    nodePort: 30500
    port: 10020
    protocol: TCP
    targetPort: 10020
  - name: 443-to-10443-tcp
    nodePort: 32013
    port: 443
    protocol: TCP
    targetPort: 10443
  - name: 22-to-10022-tcp
    nodePort: 32045
    port: 22
    protocol: TCP
    targetPort: 10022
  selector:
    app: sftpplus-app
  sessionAffinity: None
  type: LoadBalancer
With the YAML file available in the cloud console, you can create the service by using the following command:
kubectl apply -f sftpplus-service.yaml
Application pods
This section describes the creation and configuration of a workload that will run one or more pods hosting the SFTPPlus application.
It assumes that you will upload the following YAML file named sftpplus-workload.yaml to your cloud console:
apiVersion: apps/v1
kind: Deployment
metadata:
  labels:
    app: sftpplus-app
  name: sftpplus-app
  namespace: default
spec:
  progressDeadlineSeconds: 600
  replicas: 1
  revisionHistoryLimit: 10
  selector:
    matchLabels:
      app: sftpplus-app
  strategy:
    rollingUpdate:
      maxSurge: 25%
      maxUnavailable: 25%
    type: RollingUpdate
  template:
    metadata:
      labels:
        app: sftpplus-app
    spec:
      containers:
      - image: proatria/sftpplus-trial
        imagePullPolicy: Always
        name: sftpplus-trial
        resources: {}
        securityContext:
          privileged: true
        terminationMessagePath: /dev/termination-log
        terminationMessagePolicy: File
        volumeMounts:
        - mountPath: /opt/sftpplus/configuration
          name: sftpplus-configuration
        - mountPath: /opt/sftpplus/secrets
          name: sftpplus-secrets

      dnsPolicy: ClusterFirst
      restartPolicy: Always
      schedulerName: default-scheduler
      securityContext: {}
      terminationGracePeriodSeconds: 30
      volumes:
      - name: sftpplus-configuration
        configMap:
          name: sftpplus.configuration
      - name: sftpplus-secrets
        secret:
          secretName: sftpplus.secrets
The content of the cluster secret is available inside /opt/sftpplus/secrets. The cluster ConfigMap is available inside /opt/sftpplus/configuration.
Each key of the Secret or ConfigMap object will be converted into a file with the same name as the key name and the same content as the key content.
With the YAML file available in the cloud console, you can create the workload by using the following command:
kubectl apply -f sftpplus-workload.yaml